排版:Vincent Chau
前言:
百度一搜能找到很多讲APP启动流程的,但是往往要么就是太老旧(还是基于android6去分析的),要么就是不全(往往只讲了整个流程的一小部分)。所以我结合网上现有的文章,以及源码的阅读和调试,耗费了3整天的时间,力求写出一篇最完整,最详细,最通俗易懂的文章,来讲清楚在android上,APP是如何启动的。
一、APP启动流程概览
涉及到四个进程之间的通信,分别是Laucher进程(桌面APP),SystemServer进程(AMS所属进程),Zygote进程(系统和所有APP的创建进程),APP进程。
APP简要的启动流程是这样的:
1.Laucher进程会通过binder的方式通知SystemServer进程。
2.然后SystemServer进程中的AMS会查询对应的Activity栈信息,如果对应APP进程不存在则会加载占位图。然后通过socket的方式通知Zygote去创建APP进程。
3.APP进程创建后会执行main方法,然后通知AMS
4.AMS收到信息后会继续通知APP去创建Application,并且接下来会通知APP进程取拉起Activity。
5.APP进程依次收到通知后,会依次完成加载APK,初始化Application,执行Activtiy生命周期等操作。最终会把首屏展示出来。
流程图如下,建议双击放大后观看:
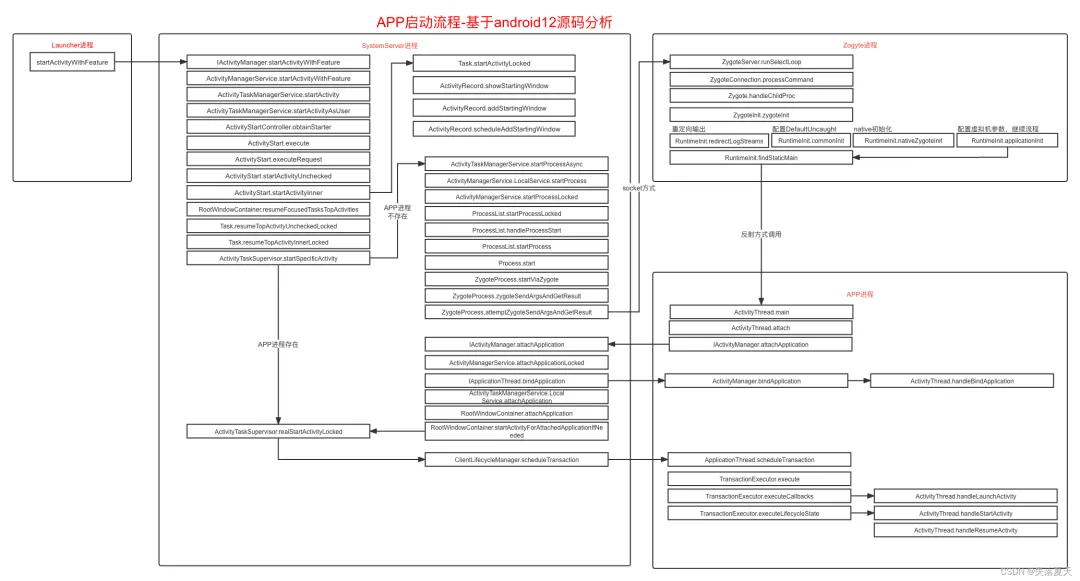
接下来的几章,会按照上面的流程逐一拆解分析:
二、Launcher通知AMS启动APP
Launcher进程其实和普通APP是一样的,甚至我们可以把自己的APP设置为桌面APP。
2.1 Launcher获取到AMS的binder
而Launcher通知AMS的流程和正常APP也是一样的,通过ServiceManager获取到AMS的binder引用。这里提到了ServiceManager,其实ServiceManagerService也是单独的一个进程,其存储了所有APP所需要的binder引用。而且其地址是固定的,所以获取ServiceManager可以直接获取。
2.2 通知ActivityManagerService
Launcher通过上述获取到的binder通知到AMS,调用的方式是startActivityWithFeature。
而由于AMS实现了IActivityManager.Stub的实现,所以其startActivityWithFeature方法会收到launcher发过来的通知。
2.3 系统进程加载占位图
AMS中,会交由ActivityTaskManagerService去进行对应启动任务的处理。最终会交给ActivityStart进行处理。
ActivityStart中,首先会进行一个逻辑判断,如果进程不存在,则首先会加载APP中MainActivity的主题作为背景图,显示到屏幕上。这一步操作是发生在SystemServer进程的,APP进程还未创建。
android11开始支持启动动画,逻辑也是在这里处理的。
2.4 AMS进行启动操作
一个进程中会有多个任务栈,栈对应的是Task类。
一个任务栈中会有多个Activity对象,这个Activity对象在AMS中使用ActivityRecord记录。
这一块的具体逻辑,我会单独写一篇Activity的启动逻辑来进行描述。
这里暂时先简单描述下,如果AMS发现进程不存在,会去通知Zygote的进行进程fork就好,对应的fork逻辑在下一章。
三、Zygote创建APP进程
3.1 AMS中内部逻辑执行
ActivityTaskManagerService调用startProcessAsync方法会去负责创建APP进程,这是异步的,通过handler转发后最终会调用到LocalService.startProcess()方法。
然后会通知到ProcessList.startProcessLocked方法,这个方法中,会构造一个对象ProcessRecord对象,然后把各种信息添加到这个对象中。
接下来会调用到ProcessList.startProcessLocked这个方法,这个方法主要是负责把各种信息转换为runtimeFlags标记位,连同上面构造的ProcessRecord继续传入下一层。
最终通知到Process.start方法,然后交由ZygoteProcess.start方法,最终传递到startViaZygote方法。
3.2 请求参数拼接成字符串发送给Zygote
startViaZygote这个方法中,会把各种配置参数拼接为字符串。
最终在ZygoteProcess.attemptUsapSendArgsAndGetResult方法中,通过LocalSocket的方式把上面拼接的字符串内容传递给Zygote进程。并且从socket中读取返回值,返回值的PID>0则证明进程创建成功。
3.3 Zygote进程逻辑
在了解Zygote进程如何解析AMS发送过来的请求之前,我们先简单了解下Zygote进程创建后的一些基本逻辑。如下图:
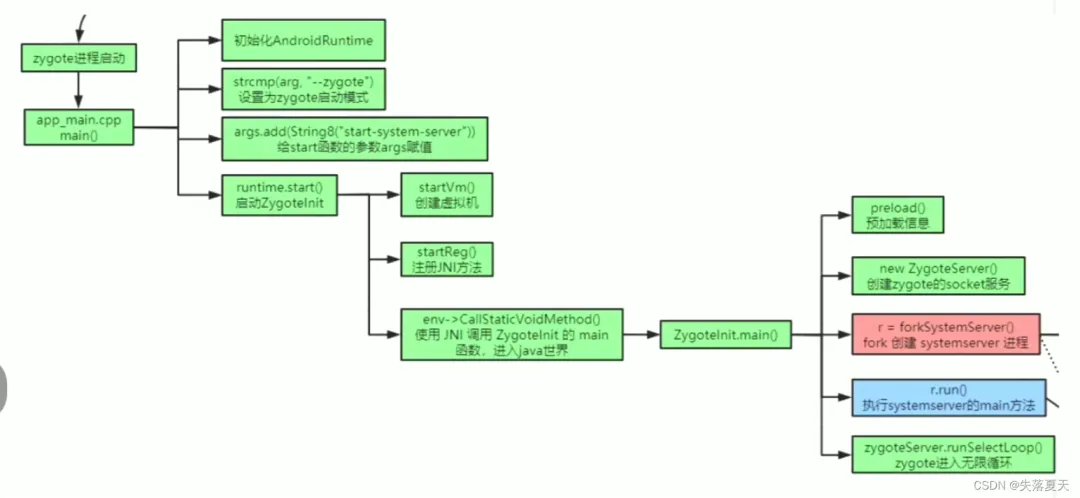
一。Zygote进程创建后,最开始的入口是在C层,app_main.cpp文件的main方法(该进程由Init进程启动,这里就不扩展了),在main方法中会配置一些JVM的参数,这个和JAVA的虚拟机参数配置类似。最终会调用到AndroidRuntime.cpp中的start函数,去启动JVM虚拟机。
if(startVm(&mJavaVM,&env, zygote, primary_zygote)!=0){
return;
}
二。虚拟机创建之后,会通过native层反射找到main函数,并调用ZygoteInit类的main函数。
AndroidRumtime.cpp的start方法中:
if(startClass ==NULL){
ALOGE("JavaVM unable to locate class '%s'\n", slashClassName);
/* keep going */
}else{
jmethodID startMeth = env->GetStaticMethodID(startClass,"main",
"([Ljava/lang/String;)V");
if(startMeth ==NULL){
ALOGE("JavaVM unable to find main() in '%s'\n", className);
/* keep going */
}else{
env->CallStaticVoidMethod(startClass, startMeth, strArray);
#if0
if(env->ExceptionCheck())
threadExitUncaughtException(env);
#endif
}
}
三。ZygoteInit类的main方法中,会做如下几件事:
第一步,把自身的进程ID设置为0,并且没有parent进程。
第二步,会进行一系列的初始化操作,比如加载native环境,加载JVM环境,加载系统类,加载系统资源等等。都在其preload方法中。
第三步,如果是首次执行,则会创建SystemServer进程。这也是Zygote进程的大儿子。AMS,WMS都属于SystemServer进程。
第四步,会创建zygoteServer对象,并且调用其runSelectLoop方法。监听socket不断的接传递过来的信息
第五步,Zygote进程的fork,其实是复制一个原原本本的自己。runSelectLoop方法中其实会去执行fork操作,这个后面会讲,我们这里只需要知道,执行到caller.run();这一句的时候,已经处于APP进程状态了。
publicstaticvoid main(String[] argv){
ZygoteServer zygoteServer =null;
// Mark zygote start. This ensures that thread creation will throw
// an error.
ZygoteHooks.startZygoteNoThreadCreation();
// Zygote goes into its own process group.
try{
Os.setpgid(0,0);
}catch(ErrnoException ex){
thrownewRuntimeException("Failed to setpgid(0,0)", ex);
}
...
if(!enableLazyPreload){
bootTimingsTraceLog.traceBegin("ZygotePreload");
EventLog.writeEvent(LOG_BOOT_PROGRESS_PRELOAD_START,
SystemClock.uptimeMillis());
//2.初始化操作
preload(bootTimingsTraceLog);
EventLog.writeEvent(LOG_BOOT_PROGRESS_PRELOAD_END,
SystemClock.uptimeMillis());
bootTimingsTraceLog.traceEnd();// ZygotePreload
}
// Do an initial gc to clean upafter startup
bootTimingsTraceLog.traceBegin("PostZygoteInitGC");
gcAndFinalize();
bootTimingsTraceLog.traceEnd();// PostZygoteInitGC
bootTimingsTraceLog.traceEnd();// ZygoteInit
Zygote.initNativeState(isPrimaryZygote);
ZygoteHooks.stopZygoteNoThreadCreation();
zygoteServer =newZygoteServer(isPrimaryZygote);
if(startSystemServer){
//3.首次启动时,会启动系统进程
Runnable r = forkSystemServer(abiList, zygoteSocketName, zygoteServer);
// {@code r ==null} in the parent (zygote) process, and {@code r !=null} in the
// child (system_server) process.
if(r !=null){
r.run();
return;
}
}
//4.启动无限循环监听socket
caller= zygoteServer.runSelectLoop(abiList);
}catch(Throwable ex){
Log.e(TAG,"System zygote died with fatal exception", ex);
throw ex;
}finally{
if(zygoteServer !=null){
zygoteServer.closeServerSocket();
}
}
// We're in the child process and have exited the select loop. Proceed to execute the
// command.
if(caller!=null){
//5.这里的调用已经是在APP进程了,zygote进程永远不会执行到这里
caller.run();
}
}
3.4 收到通知后去fork产生APP进程
runSelectLoop方法中,会开启一个无限循环。如果收到了消息
如果收到了消息,则会调用ZygoteConnection.processCommand去处理。
Runnable runSelectLoop (String abiList){
// ...
while(true){
// ...
try{
ZygoteConnection connection = peers.get(pollIndex);
boolean multipleForksOK =!isUsapPoolEnabled()
&&ZygoteHooks.isIndefiniteThreadSuspensionSafe();
//收到消息,处理消息并且返回runnable。
finalRunnable command =
connection.processCommand(this, multipleForksOK);
// TODO (chriswailes): Is this extra check necessary?
if(mIsForkChild){
if(command ==null){
thrownewIllegalStateException("command == null");
}
//子进程执行,子进程的mIsForkChild会被设置为true,则返回command
return command;
}else{
//Zygote进程执行,则继续执行循环
// ...
}
}
}
}
而在processCommand中,会解析收到的参数,最终调用Zygote.forkAndSpecialize去fork一个新进程。这个方法虽然只会调用一次,返回因为进程是拷贝的,所以实际上会有两次返回,返回两个pid。pid为0时为子进程,设置标记为子进程。反之仍就还是Zygote进程。
pid =Zygote.forkAndSpecialize(parsedArgs.mUid, parsedArgs.mGid,
parsedArgs.mGids, parsedArgs.mRuntimeFlags, rlimits,
parsedArgs.mMountExternal, parsedArgs.mSeInfo, parsedArgs.mNiceName,
fdsToClose, fdsToIgnore, parsedArgs.mStartChildZygote,
parsedArgs.mInstructionSet, parsedArgs.mAppDataDir,
parsedArgs.mIsTopApp, parsedArgs.mPkgDataInfoList,
parsedArgs.mAllowlistedDataInfoList, parsedArgs.mBindMountAppDataDirs,
parsedArgs.mBindMountAppStorageDirs);
try{
if(pid ==0){
//in child
zygoteServer.setForkChild();
zygoteServer.closeServerSocket();
IoUtils.closeQuietly(serverPipeFd);
serverPipeFd =null;
return handleChildProc(parsedArgs, childPipeFd,
parsedArgs.mStartChildZygote);
}else{
//In the parent. A pid <0 indicates a failure and will be handled in
// handleParentProc.
IoUtils.closeQuietly(childPipeFd);
childPipeFd =null;
handleParentProc(pid, serverPipeFd);
returnnull;
}
}finally{
IoUtils.closeQuietly(childPipeFd);
IoUtils.closeQuietly(serverPipeFd);
}
3.5 调用ActivityThread.main方法
调用到handleChildProc方法时,已经处于APP进程的状态。
该方法掉调用到ZygoteInit.zygoteInit()方法,相关代码如下:
publicstaticRunnablezygoteInit(int targetSdkVersion,long[] disabledCompatChanges,
String[] argv,ClassLoader classLoader){
...
RuntimeInit.redirectLogStreams();
RuntimeInit.commonInit();
ZygoteInit.nativeZygoteInit();
returnRuntimeInit.applicationInit(targetSdkVersion, disabledCompatChanges, argv,
classLoader);
}
第一步,把System.out的输出重定向到Logcat中;
第二步,在commonInit方法中,设置Thread的UncaughtExceptionPreHandler和DefaultUncaughtExceptionHandler。用于应用发生异常时的处理,这里稍微扩展下,DefaultUncaughtExceptionHandler设置的是RuntimeInit.KillApplicationHandler,所以所有最终未处理的异常都会走到这个类中。
第三步,native中进行相关的初始化。
最后一步,做VM虚拟机的一些配置,然后就会调用findStaticMain方法。
接下来,我们看下findStaticMain方法:
protectedstaticRunnablefindStaticMain(String className,String[] argv,
ClassLoader classLoader){
Class<?> cl;
try{
cl =Class.forName(className,true, classLoader);
}catch(ClassNotFoundException ex){
thrownewRuntimeException(
"Missing class when invoking static main "+ className,
ex);
}
Method m;
try{
m = cl.getMethod("main",newClass[]{String[].class});
}catch(NoSuchMethodException ex){
thrownewRuntimeException(
"Missing static main on "+ className, ex);
}catch(SecurityException ex){
thrownewRuntimeException(
"Problem getting static main on "+ className, ex);
}
int modifiers = m.getModifiers();
if(!(Modifier.isStatic(modifiers)&&Modifier.isPublic(modifiers))){
thrownewRuntimeException(
"Main method is not public and static on "+ className);
}
/*
* This throw gets caught in ZygoteInit.main(), which responds
* by invoking the exception's run() method. This arrangement
* clears up all the stack frames that were required in setting
* up the process.
*/
returnnewMethodAndArgsCaller(m, argv);
}
这里只看到出现了main方法,并没有看到ActivityThread类的声明。所以,是如何最终选择启动类类中的main方法呢?其实原理很简单,这个方法中有一个className参数,这个其实就是ActivityThread类,它是通过socket传递过来的一个参数,其定义在ProcessList的startProcessLocked方法中
所以最后返回的其实是一个runnable接口实现类,而这个runnable中实现了调用ActivityThread中main方法的逻辑。
还记得3.3中Zygote创建后的逻辑吗?最后一句是调用 caller.run();
是的,这个caller就是最后返回的runnable接口实现类,去完成调用main方法的操作。
四、APP进程创建初始化操作
app进程初始化的操作比较简单,主要做了两件事,初始化looper,以及通知AMS。(注意,这里只是APP进程创建了,但是还没有加载APK中的任何类)
4.1 初始化MainLooper
调用main方法的线程,会被设置为主线程,Looper此时会开启无限循环。
main(){
//looper绑定主线程
Looper.prepareMainLooper();
//通知AMS
ActivityThread thread =newActivityThread();
thread.attach(false, startSeq);
//looper开启无限循环读取消息
Looper.loop();
}
4.2 通知AMS
ActivityThread.attach方法中,实现逻辑也是比较简单的,直接通过binder通知AMS,并且把自身的binder(ApplicationThread)也传递给AMS。
finalIActivityManagermgr=ActivityManager.getService();
try{
mgr.attachApplication(mAppThread, startSeq);
}catch(RemoteException ex){
throw ex.rethrowFromSystemServer();
}
这里AMS的binder是直接通过ServierManager的方式获取的。ServierManager存储了所有的binder引用,注册的形式,AMS在启动的时候去注册。
五、AMS通知APP进程进行各种生命周期操作
5.1 唤起APP初始化并拉起APP首屏
ActivityManagerService的attachApplication方法会收到APP传递过来的消息,然后交由attachApplicationLocked处理。
attachApplicationLocked中主要负责两件事:
1.通知APP进程进行初始化操作;
2.进行一些列操作,最终通知APP拉起指定的MainActivity。
说到这,问一个问题1,为什么明明是串行通知APP去执行的,而APP那边不会出现先加载Activity,再去初始化应用的情况呢?答案在下一小节。
@GuardedBy("this")
privateboolean attachApplicationLocked(@NonNullIApplicationThread thread,
int pid,int callingUid,long startSeq){
...
if(app.getIsolatedEntryPoint()!=null){
...
}elseif(instr2!=null){
//1通知APP进行初始化操作
thread.bindApplication(processName, appInfo, providerList,
instr2.mClass,
profilerInfo, instr2.mArguments,
instr2.mWatcher,
instr2.mUiAutomationConnection, testMode,
mBinderTransactionTrackingEnabled, enableTrackAllocation,
isRestrictedBackupMode ||!normalMode, app.isPersistent(),
newConfiguration(app.getWindowProcessController().getConfiguration()),
app.getCompat(), getCommonServicesLocked(app.isolated),
mCoreSettingsObserver.getCoreSettingsLocked(),
buildSerial, autofillOptions, contentCaptureOptions,
app.getDisabledCompatChanges(), serializedSystemFontMap);
}else{
...
同上
}
...
// See if the top visible activity is waiting torunin this process...
if(normalMode){
try{
//拉起
didSomething = mAtmInternal.attachApplication(app.getWindowProcessController());
}catch(Exception e){
Slog.wtf(TAG,"Exception thrown launching activities in "+ app, e);
badApp =true;
}
}
...
returntrue;
}
5.2 APP进行初始化操作
ActivityThread中ApplicationThread的bindApplication会收到通知,通过handler交给主线程去处理。所以我们也就知道上面问题1的答案了,无论是初始化APP,还是拉起Activity,都是最终交给Handler切换到主线程处理的。所以哪怕初始化APP是耗时操作,拉起Activity的任务也得排队等到前面任务执行完了才能执行。
最终通过handler是交给handleBindApplciation去完成APP的初始化逻辑的。主要包含下面几个操作:
1.使用classLoader去加载APK中的DEX文件。
2.加载APK中的资源。
3.反射生成Application类,并调用其attachBaseApplication方法。
4.调用Application的onCreate方法。
@UnsupportedAppUsage
privatevoid handleBindApplication(AppBindDatadata){
//1.classLoader加载APK中的dex,并且加载APK的资源
finalContextImpl appContext =ContextImpl.createAppContext(this,data.info);
//Continue loading instrumentation.
//2.生成代理类
mInstrumentation =newInstrumentation();
mInstrumentation.basicInit(this);
// Allow disk access during application and provider setup. This could
//block processing ordered broadcasts, but later processing would
// probably endup doing the same disk access.
Application app;
//3.声明application
app =data.info.makeApplication(data.restrictedBackupMode,null);
...
//4.调用Application的onCreate
mInstrumentation.onCreate(data.instrumentationArgs);
}
onCreate创建完成后并不会通知AMS,因为activity的拉起操作和初始化Application在AMS中是串行的。
5.3 AMS中处理Activity启动逻辑
5.1中讲到attachApplicationLocked会最终通知APP去拉起Activity,那么整个流程是怎样的呢?
会执行下面这样的调用顺序。
ActivityManagerService.attachApplicationLocked->
ActivityTaskManagerService.LocalService.attachApplication->
RootWindowContainer.attachApplication->
RootWindowContainer.startActivityForAttachedApplicationIfNeeded->
ActivityTaskSupervisor.realStartActivityLocked
到了realStartActivityLocked这一步,正好对应2.4所讲的。APP进程存在的也会调用这个方法,而不存在则先创建进程,最终也会执行到这一步。
realStartActivityLocked中创建Activity的生命周期事务,最终通过ClientLifecycleManager.scheduleTransaction通过binder发送到APP进程的ApplicationThread.scheduleTransaction方法中,则AMS流程就完成了。
5.4 APP完成Activity的启动
生命周期事务是安卓8.0之后出现的,简单来说就是之前的模式是:
AMS发一个协商好消息,APP收到后,根据消息内存来决定自己去做操作;
而事务模式下,AMS发送一系列事务到APP进程,APP收到后,直接去执行这一系列的事务。而这些事务就是activity的生命周期调用。
Google Developer Groups 谷歌开发者社区,是谷歌开发者部门发起的全球项目,面向对 Google 和开源技术感兴趣的人群而存在的公益性开发者社区。GDG Shanghai 创立于 2009 年,是全球 GDG 社区中最活跃和知名的技术社区之一,每年举办 30 – 50 场大大小小的科技活动,每年影响十几万以上海为中心辐射长三角地带的开发者及科技从业人员。

社区中的各位组织者均是来自各个行业有着本职工作的互联网从业者,我们需要更多新鲜血液的加入!如果你对谷歌技术感兴趣,业余时间可调配,认同社区的价值观,愿意为社区做出贡献,欢迎加入我们成为社区志愿者!如果您能为活动提供餐饮、物料制作、礼品、宣发、会务等支持,欢迎联系我们成为赞助合作伙伴。
志愿者加入方式:关注上海 GDG 公众号:GDG_Shanghai,回复:志愿者
赞助合作伙伴加入方式:关注上海 GDG 公众号:GDG_Shanghai,回复:赞助
社区成员加入方式:社区成员可以通过邮箱接收到我们的活动信息,请发任意邮件至以下邮箱 gdg-shanghai+subscribe@googlegroups.com
 10个月宝宝每天需要喝多少奶粉?
