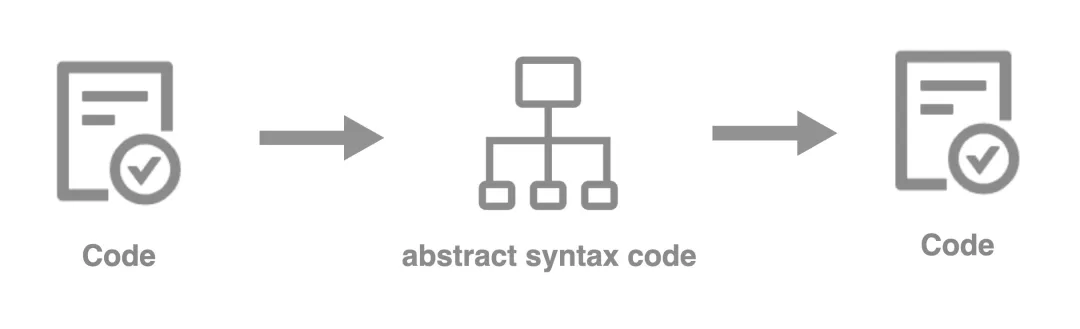
解析路由是构建过程的首要任务,只有拿到业务中的路由信息后才能知道有哪些页面需要被注册,就像原生小程序的 app.json 中的 pages、tabBar.list 字段一样需要先将路由信息注册到小程序中。
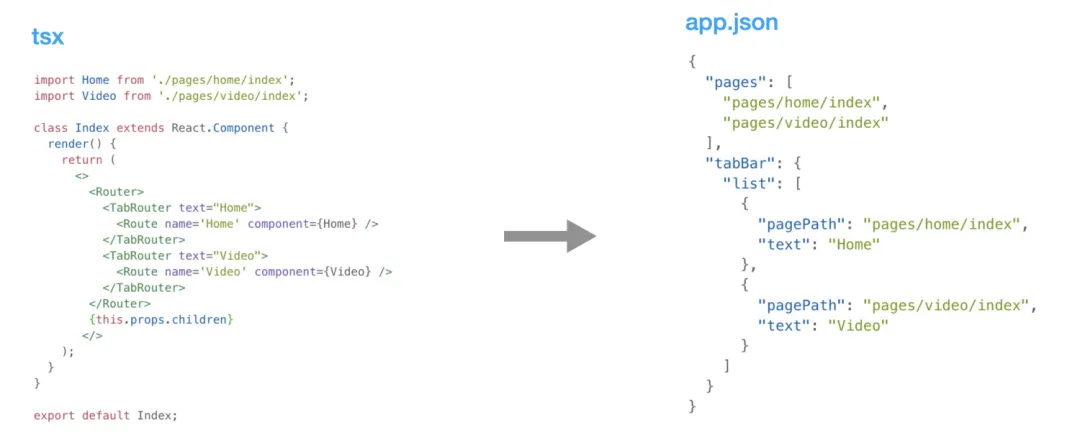
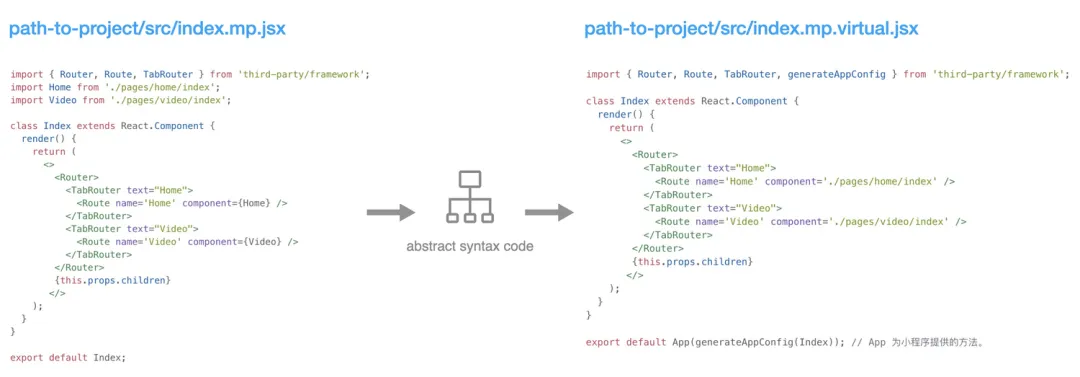
解析路由的核心逻辑是对源码进行 AST(抽象语法树) 操作。我们再回过头来看一下路由的声明方式:import { Router, Route, TabRouter } from 'third-party/framework';import Home from './pages/home/index';import Video from './pages/video/index';class Index extends React.Component { render() { return ( <> <Router> <TabRouter text="Home"> <Route name='Home' component={Home} /> </TabRouter> <TabRouter text="Video"> <Route name='Video' component={Video} /> </TabRouter> </Router> {this.props.children} </> ); }}export default Index;
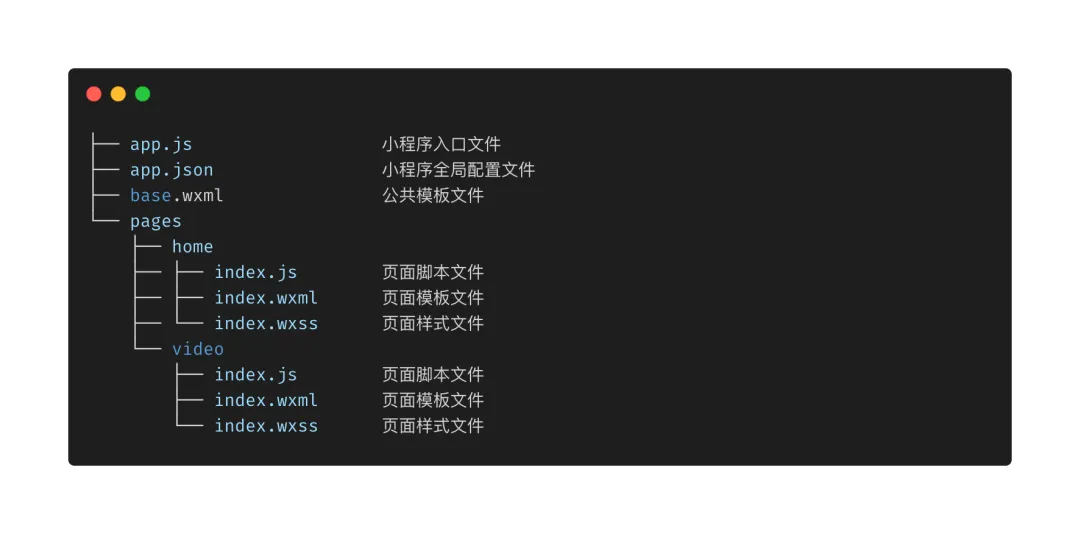
再来看一下小程序的 app.json 配置示例(以微信小程序为例):
{ "pages": [ "pages/home/index", "pages/video/index" ], "tabBar": { "list": [ { "pagePath": "pages/home/index", "text": "Home" }, { "pagePath": "pages/video/index", "text": "Video" } ] }}
细心观察似乎发现这两者潜藏着一些关系:
在理清楚逻辑后就可以写代码解析路由了,由于本步骤所涉及到的代码篇幅较长,这里只放伪代码用于参考。// plugins/babel-router-plugin.tsexport default { pre() { // 每次解析前清空之前的结果,避免路由重复。 }, post() { // 解析完后把结果存储起来,后面需要用到。 }, visitor: { ImportDeclaration({ node: { specifiers, source } }) { // 把引用的路径存起来,用于后续生成文件时使用。 }, ReturnStatement(paths) { // AST 词法分析,TabRouter 代表 TabBar,Route 代表普通路由、Subpackage 代表分包。 }, },}
封装一个解析路由的辅助方法,在其内部调用上面的插件:
// utils/routes.tsimport path from 'path';import * as babel from '@babel/core';import jetpack from 'fs-jetpack';/** * 解析项目的路由文件,获取路由信息。 * @param base workspace * @param entry 路由文件路径 * @param plugins babel plugins */export const analysis = (base: string, entry: string, plugins?: any | any[]) => { const options = { plugins: [].concat(plugins), presets: [ [ '@babel/preset-typescript', { ... } ] ], }; return new Promise((resolve, reject) => { try { const filepath = path.resolve(base, entry); const content = jetpack.read(filepath, 'utf8'); resolve(babel.transform(content, options).code); } catch (error) { reject(error); } });}
有了上面的插件和辅助方法,调用它们就能拿到对应的路由信息了。
import { analysis } from './utils/routes';import BabelRouterPlugin from './plugins/babel-router-plugin';analysis(base, 'src/index.mp.tsx', BabelRouterPlugin).then(() => { // ...});
最终我们拿到的路由信息的结构看起来像是这样:
{ "pages": [ "pages/home/index", "pages/video/index" ], "tabBar": { "list": [ { "pagePath": "pages/home/index", "text": "Home" }, { "pagePath": "pages/video/index", "text": "Video" } ] }}
看起来跟上文举例用的小程序的 app.json 内容一模一样,实际上也是这样。在拿到路由信息后我们需要将这些信息存放起来,后续的过程中会用到。
Webpack Virtual Modules is a plugin that allows for dynamical generation of in-memory virtual modules for JavaScript builds created with webpack. When virtual module is created all the parent virtual dirs that lead to the module filename are created too. This plugin supports watch mode meaning any write to a virtual module is seen by webpack as if a real file stored on disk has changed.
摘自:webpack-virtual-modules readme.md。
上文简单翻译过来的意思:Webpack Virtual Modules 是一个插件,它允许为用 Webpack 创建的 JavaScript 构建动态生成内存中的虚拟模块。创建虚拟模块时,也会创建模块文件名的所有父虚拟目录。它支持监视模式,这意味着任何对虚拟模块的写入都会被 webpack 看到,就像是存储在磁盘上的真实文件被修改了一样。在开始这一步之前我们需要先了解一下能让一个小程序跑起来的几个要素:1、必备的 app.json、app.js 以及页面文件。2、必须调用 App 来注册小程序、必须调用 Page 注册页面。
3、页面路由信息必须在 app.json 文件中声明。
其中第二个关键要素是本节点相关的,在实际项目中我们是不希望业务侧的同学去写跟小程序直接关联的代码,所以我们必须得经过 AST 操作修改源代码然后借助 Webpack Virtual Modules 生成对应的虚拟文件并监听其内容的修改重新打包。
到目前为止,整个编译的过程已经介绍了一大半,最后一步需要生成页面的模板文件,即:index.wxml,该文件是必须存在,否则小程序会报错且无法渲染该页面的视图。
由于我们的方案是基于小程序的 template 来实现(动态渲染方案) ,所以需要把所使用到的组件模板都提前声明好,在这里我们把这些模板统一放在 base.wxml 文件中,最后在各个页面中调用即可。<!-- pages/home/index.wxml --><import src="/base.wxml" /> <!-- 公共模板文件 --><template is="OCTOPUS_BASE_TEMPLATE" data="{{root: root}}" />
base.wxml
<!-- helper.wxs 文件内置了一些简单的辅助函数 --><wxs src='./helper.wxs' module="helper" /><!-- 根模板,调用该模板可 --><template name="OCTOPUS_BASE_TEMPLATE"> <!-- root 为一棵完整的 VNode tree --> <block wx:for="{{root.cn}}" wx:key="id"> <template is="OCTOPUS_1_CONTAINER" data="{{i: item, ancestor: ''}}" /> </block></template><template name="oc_button"> <button id="{{helper.v(i['id'])}}" bindtap="eh" ...> <block wx:for="{{i.cn}}" wx:key="id"> <template is="{{'OCTOPUS_' + (tid + 1) + '_CONTAINER'}}" data="{{i: item, ancestor: ancestor + ',' + i.typ, tid: tid + 1 }}" /> </block> </button></template>...<template name="OCTOPUS_1_CONTAINER" data="{{i: i}}"> <template is="{{helper.tid(i.te, ancestor, i.id)}}" data="{{i: i, ancestor: ancestor + ',' + i.te, tid: 1 }}" /></template><template name="OCTOPUS_2_CONTAINER" data="{{i: i}}"> <template is="{{helper.tid(i.te, ancestor, i.id)}}" data="{{i: i, ancestor: ancestor + ',' + i.te, tid: 1 }}" /></template>...
有了上面的模板文件后,就具备了渲染页面的能力。在进到页面的时候会调用 OCTOPUS_BASE_TEMPLATE 模板,根据页面的 虚拟 DOM 树 递归去找对应的组件模板,最终渲染成正确的视图。
经过上面的流程拆解,我们可以将以上的流程封装成以下几个插件:
你也可以继续封装其他的插件,如:处理自定义组件的、自动分析已使用的组件用于生成更干净的公共模板文件,或者是其他用途的插件。
在封装好需要的插件后,就可以唤起 webpack 来编译代码了。
import webpack from 'webpack';import { analysis } from './utils/routes';import BabelRouterPlugin from './plugins/babel-router-plugin';import WebpackEntryProcesserPlugin from './plugins/webpack-entry-processer-plugin';import WebpackTemplateGeneatorPlugin from './plugins/webpack-template-generator-plugin';const getWebpackConfig = (...args) => { return { ..., plugins: [ new WebpackEntryProcesserPlugin(), new WebpackTemplateGeneatorPlugin(), ... ], };};const build = async ({ target, debug, watch, base, zip, compress, progress }) => { analysis(base, 'src/index.mp.tsx', BabelRouterPlugin).then(() => { const compiler = webpack(getWebpackConfig({ ... })); if (watch === true) { compiler.watch({ // 注意:监听文件时应忽略虚拟模块,否则会陷入死循环 ignored: [ '**/**.virtual.ts', ... ], }, () => { // Skip... }); } else { // Skip... } });});